Kitchenaid Ice Cream Recipe: The Best Ingredients to Use
Kitchenaid Ice Cream Recipe
Table of Contents
Ever Wonder if That Shiny KitchenAid Ice Cream Maker Gathering Frost in Your Freezer Can Churn Out Scoop-Shop-Worthy Ice Cream, or Are You Doomed to Icy Disappointment?
You bought the attachment, you froze the bowl (maybe?), and you dream of creamy, dreamy homemade ice cream. But let’s be honest: have you hesitated? Maybe you’ve tried a recipe that ended up more like a sweet ice block than smooth, luscious ice cream. Or perhaps you’re just overwhelmed by the different recipes out there, wondering which ingredients truly make a difference. Well, fear not! The secret to incredible homemade ice cream isn’t magic; it’s about understanding the why behind the ingredients and the process. Get ready to unlock the secrets to a consistently creamy, perfectly balanced Kitchenaid Ice Cream Recipe that will make you ditch the store-bought tubs for good.
Overview: Why This Kitchenaid Ice Cream Recipe is Special
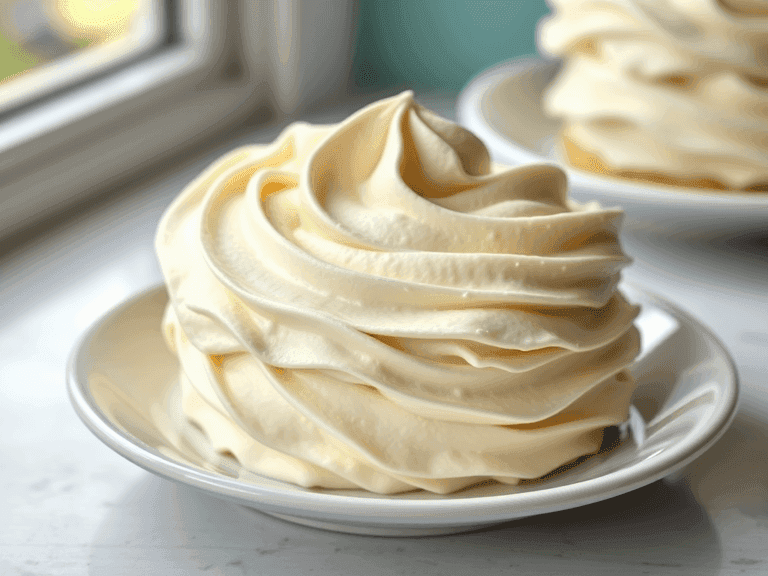
This isn’t just any recipe; it’s a foundational guide focused on achieving that perfect consistency and ingredient harmony. We’re aiming for a classic, rich, Philadelphia-style or French-style custard base (we’ll discuss both!) because these methods yield incredibly smooth, flavorful results that showcase the power of your KitchenAid attachment. What makes this Kitchenaid Ice Cream Recipe special is its reliability and focus on quality ingredients that work together beautifully.
- Time Requirement: Making amazing ice cream requires planning!
- Freezing the Bowl: 15-24 hours SOLIDLY frozen (non-negotiable!).
- Making the Base: 15-20 minutes active prep/cooking.
- Chilling the Base: At least 4-6 hours, preferably overnight (CRUCIAL!).
- Churning: 20-30 minutes in the KitchenAid attachment.
- Ripening/Hardening: 2-4 hours (or more) in the freezer.
While there’s waiting involved, the active time for this Kitchenaid Ice Cream Recipe is quite manageable.
- Difficulty Level: Easy to Medium. The steps themselves aren’t complex, but attention to detail (like properly chilling and not overheating the custard) is key. If you can follow instructions carefully, you can master this Kitchenaid Ice Cream Recipe.

Essential Ingredients: The Building Blocks of Creamy Perfection
The secret to avoiding icy, grainy, or bland homemade ice cream lies in using the right ingredients in the right proportions. Each component plays a vital role in the final texture and flavor harmony of your Kitchenaid Ice Cream Recipe.
Here’s the breakdown of the best ingredients for a classic Vanilla Bean base:
- Heavy Cream (High Fat Content is Key!):
- Why It’s Important: This is the #1 ingredient for creaminess! Fat molecules interfere with the formation of large ice crystals, resulting in a smoother, richer texture. Heavy cream (or heavy whipping cream) typically contains 36% milkfat or more. Using lower-fat cream will result in a less creamy, potentially icier final product. Don’t skimp on the fat for the best Kitchenaid Ice Cream Recipe texture.
- Substitutions: You can substitute some of the heavy cream with half-and-half or whole milk, but be aware that this will negatively impact the creaminess and make it more prone to iciness. For the richest results, stick to heavy cream as the primary component.
- Whole Milk:
- Why It’s Important: Provides liquid volume, dairy flavor, and additional milk solids without adding too much fat (which can sometimes feel heavy or coat the mouth). The balance between cream and whole milk is crucial for a texture that’s rich but not greasy. Using whole milk contributes necessary components for a well-rounded Kitchenaid Ice Cream Recipe.
- Substitutions: You can use low-fat milk, but again, expect a less creamy, potentially icier result due to the lower fat and solids content. Avoid skim milk if possible. Some non-dairy milks can work but require recipe adjustments (more on that later).
- Granulated Sugar:
- Why It’s Important: Sweetness is obvious, but sugar does much more! It lowers the freezing point of the mixture, preventing it from freezing rock solid. This is essential for scoopability and a smooth texture. It also contributes to the body of the ice cream. The correct amount of sugar is vital for the structure of your Kitchenaid Ice Cream Recipe.
- Substitutions: You can experiment with brown sugar (which adds a molasses flavor), maple syrup, or honey, but they will change the flavor profile and may alter the freezing point slightly. Reducing sugar significantly will make the ice cream harder and icier. Artificial sweeteners often don’t provide the same freezing point depression or body.
- Egg Yolks (For French-Style Custard Base):
- Why It’s Important: Egg yolks are powerful emulsifiers (thanks to lecithin), which means they help bind the fat and water molecules together, preventing separation and promoting incredible smoothness. They also add richness, color, and a distinct custard flavor. Yolks are key to the luxurious texture of many high-quality Kitchenaid Ice Cream Recipe bases. (Note: Philadelphia-style bases omit eggs for a lighter, cleaner dairy flavor).
- Substitutions: There isn’t a direct substitute for the unique properties of egg yolks in a traditional French custard. You can opt for an eggless (Philadelphia-style) Kitchenaid Ice Cream Recipe if preferred, which relies more heavily on the fat and sugar balance.
- Pure Vanilla Extract or Vanilla Bean:
- Why It’s Important: Provides the classic, aromatic flavor we associate with vanilla ice cream. Using pure extract or scraping a real vanilla bean offers the best, most complex flavor compared to imitation vanilla. Quality flavoring is essential for a delicious Kitchenaid Ice Cream Recipe.
- Substitutions: Vanilla bean paste is a great alternative. You can also use other extracts (like peppermint and almond) to create different flavor bases.
- Fine Sea Salt:
- Why It’s Important: It might seem counterintuitive in a sweet treat, but a small pinch of salt enhances the sweetness and balances the richness of the dairy. It makes all the other flavors pop! Don’t skip this tiny but mighty ingredient in your Kitchenaid Ice Cream Recipe.
- Substitutions: Regular table salt works; just use slightly less, as it can be saltier by volume.
Step-by-Step Instructions: Churning Magic with Your Kitchenaid
Let’s walk through making a classic French-style (custard base) vanilla Kitchenaid Ice Cream Recipe. (For an eggless version, simply skip steps involving eggs and ensure ingredients are well combined and chilled).
Phase 1: Preparing the Custard Base
- Freeze the Bowl Solid: This is Step Zero! Place your KitchenAid freezer bowl in the coldest part of your freezer (usually the back) for at least 15 hours, ideally 24. It needs to be completely frozen solid. Shake it – if you hear any liquid sloshing, it’s NOT ready. A properly frozen bowl is non-negotiable for a successful Kitchenaid Ice Cream Recipe.
- Combine Liquids & Sugar: In a medium, heavy-bottomed saucepan, combine the heavy cream, whole milk, and about half of the sugar. If using a vanilla bean, split it lengthwise, scrape the seeds into the pot, and toss the pod in, too. Add the pinch of salt.
- Warm gently: Place the saucepan over medium-low heat. Stir occasionally, just until the mixture is warm and steamy and the sugar is dissolved. Don’t let it boil! You just want to infuse the flavors and prepare it for the eggs. This gentle heating starts building the flavor foundation of your Kitchenaid Ice Cream Recipe.
- Prepare the Yolks: While the milk mixture is warming, whisk the egg yolks and the remaining sugar together in a separate medium bowl until pale yellow and slightly thickened. This process begins to dissolve the sugar into the yolks.
- Temper the Eggs (Crucial Step!): This prevents scrambled eggs. Once the milk mixture is warm (remove the vanilla pod if used), slowly pour about half a cup of the warm liquid into the egg yolk mixture while whisking constantly. Then, whisk another half cup in. This gradually raises the temperature of the yolks without cooking them. Mastering tempering is key for a smooth custard-based Kitchenaid Ice Cream Recipe.
- Combine and Cook Custard: Pour the tempered egg yolk mixture back into the saucepan with the remaining warm milk/cream mixture. Whisk to combine.
- Cook gently: Return the saucepan to medium-low heat. Cook, stirring constantly with a wooden spoon or heatproof spatula, scraping the bottom and sides, until the custard thickens slightly and coats the back of the spoon (an instant-read thermometer should register 170-175°F or 77-79°C). Do not let it boil, or it will curdle. This careful cooking develops the custard base for your Kitchenaid Ice Cream Recipe.
- Strain: Immediately pour the finished custard through a fine-mesh sieve into a clean bowl. This catches any potential bits of cooked egg or vanilla pod fragments, ensuring a perfectly smooth texture. Add the pure vanilla extract at this stage if you didn’t use a bean. Straining is a quality control step for the best Kitchenaid Ice Cream Recipe.
Phase 2: Chilling (The Waiting Game)
- Cool Down: Let the custard cool slightly at room temperature for about 20-30 minutes. You can place the bowl in an ice bath (a larger bowl filled with ice and water) to speed this up, stirring occasionally.
- Chill Thoroughly: Cover the bowl with plastic wrap, pressing it directly onto the surface of the custard to prevent a skin from forming. Refrigerate for at least 4-6 hours, but preferably overnight. The base MUST be completely cold (below 40°F or 4°C) before churning. Insufficient chilling is a primary cause of icy results in any Kitchenaid Ice Cream Recipe.
Phase 3: Churning with the Kitchenaid Attachment
- Assemble the Attachment: Retrieve your SOLIDLY frozen bowl from the freezer. Place it onto your KitchenAid stand mixer. Insert the dasher (the paddle). Secure the drive assembly according to your mixer model’s instructions.
- Start the Mixer: Turn the KitchenAid mixer to the lowest speed setting (usually “Stir”).
- Pour in the Base: While the mixer is running, slowly pour the thoroughly chilled custard base into the frozen bowl through the opening in the top. Pouring while it’s running prevents the base from freezing instantly onto the cold bowl walls. This is the exciting part of making your Kitchenaid Ice Cream Recipe!
- Churn: Let the mixer run for 20-30 minutes. The mixture will gradually thicken and increase in volume. It’s ready when it reaches the consistency of thick, soft-serve ice cream. The exact time depends on your base temperature and how cold the bowl is. Keep an eye on the progress of your Kitchenaid Ice Cream Recipe.
- Add Mix-Ins (Optional): If adding things like chocolate chips, chopped cookies, or fruit swirls, add them during the last 1-2 minutes of churning, just long enough to incorporate them evenly without breaking them down too much.
Phase 4: Ripening (Final Freeze)
- Transfer and Store: Immediately transfer the churned ice cream (it will be soft) into a freezer-safe, airtight container. Smooth the top and press a piece of plastic wrap or parchment paper directly onto the surface to prevent ice crystals. Seal the container tightly. Prompt transfer is important for the texture of your Kitchenaid Ice Cream Recipe.
- Freeze to Harden: Place the container in the coldest part of your freezer for at least 2-4 hours or until firm enough to scoop easily. This “ripening” stage allows the ice cream to fully harden and the flavors to meld further.

Assembly: Serving Your Homemade Masterpiece
You’ve done it! You’ve navigated the steps of this fantastic Kitchenaid Ice Cream Recipe. Now for the fun part – serving!
- The Scoop: Use a proper ice cream scoop dipped briefly in hot water for smooth, round servings.
- Vessels: Classic cones (sugar, waffle, cake), simple bowls, or get fancy with coupe glasses.
- Toppings Galore: Let your creativity run wild!
- Sauces: Hot fudge, caramel, fruit coulis (raspberry, strawberry), maple syrup.
- Crunch: Chopped nuts (pecans, walnuts, almonds), sprinkles, chocolate chips, crushed cookies (Oreos, shortbread), granola.
- Fruit: Fresh berries, sliced bananas, cherries.
- Other: Whipped cream, marshmallows, shredded coconut.
- Pairing toppings thoughtfully can elevate even a simple vanilla Kitchenaid Ice Cream Recipe.
Storage and Make-Ahead Tips: Keeping It Creamy
Homemade ice cream is best enjoyed relatively fresh, as it lacks the stabilizers found in commercial brands. Here’s how to store your Kitchenaid Ice Cream Recipe creations:
- Airtight is Right: Use a container specifically designed for freezing, with a tight-fitting lid. Shallow, wide containers often work well.
- Surface Contact: Always press plastic wrap or parchment paper directly onto the surface of the ice cream before sealing the lid. This minimizes contact with air, a major enemy that causes ice crystals and freezer burn.
- Coldest Spot: Store your container in the coldest part of your freezer (usually the back, away from the door). Temperature fluctuations from opening the door can degrade the texture.
- Enjoy Promptly: For the absolute best texture and flavor, try to enjoy your homemade Kitchenaid Ice Cream Recipe within 1-2 weeks. It can last longer, but the risk of iciness increases over time.
- Make-Ahead: You can make the custard base 1-2 days ahead and keep it tightly covered in the refrigerator. Remember, the freezer bowl needs 15-24 hours in the freezer. Plan accordingly!
(Note: Ice cream doesn’t get “reheated.” If it melts, refreezing will result in a very icy texture.)
Recipe Variations: Flavor Adventures Await!
Once you master the basic vanilla Kitchenaid Ice Cream Recipe, the possibilities are endless! Use the same base method and swap flavorings or add mix-ins:
- Rich Chocolate: Add melted and slightly cooled unsweetened or bittersweet chocolate (about 4-6 oz) to the warm custard base before chilling, or whisk in cocoa powder (about 1/2 cup) with the sugar.
- Strawberry Swirl: Prepare the vanilla base. Make a simple strawberry sauce (cook fresh or frozen strawberries with a little sugar and lemon juice, then cool completely). Swirl the sauce into the ice cream as you transfer it to the storage container after churning.
- Mint Chocolate Chip: Replace vanilla extract with peppermint extract (use sparingly; it’s strong!). Add chopped dark chocolate or mini chocolate chips during the last minute of churning this Kitchenaid Ice Cream Recipe variation.
- Coffee Kick: Dissolve 2-3 tablespoons of instant espresso powder in the warm milk/cream mixture before adding eggs. Or, steep coarse coffee grounds in the cold milk/cream overnight, then strain before proceeding.
- Cookie Dough: Prepare the vanilla base. Make a batch of safe-to-eat eggless cookie dough (using heat-treated flour). Crumble small pieces of the dough and add them during the last minute of churning your Kitchenaid Ice Cream Recipe.
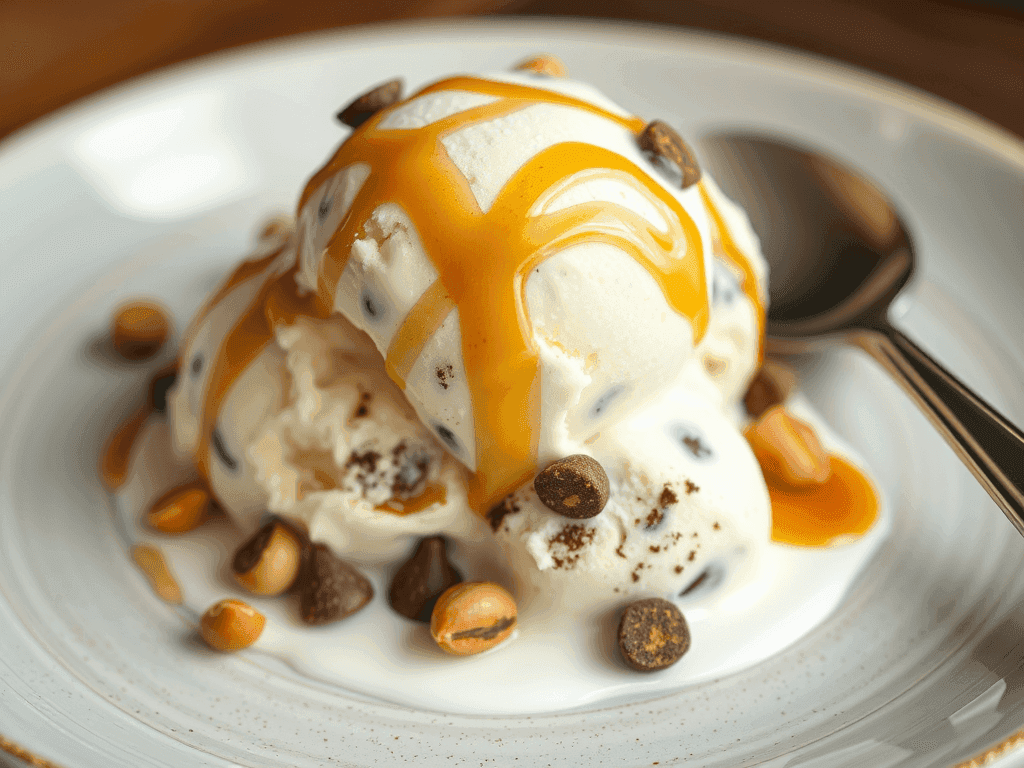
- Salted Caramel: Make or buy a quality caramel sauce. Swirl it into the vanilla ice cream after churning, or incorporate some directly into the base (adjusting sugar slightly). Add a sprinkle of flaky sea salt.
Conclusion: Your Freezer Just Got Happier!
Making incredible ice cream at home isn’t some impossible dream – especially not with your trusty KitchenAid attachment and a solid understanding of the process. By focusing on quality ingredients, understanding their roles, and following the key steps (especially freezing the bowl and chilling the base!), you can consistently create creamy, dreamy, and flavorful results. This foundational Kitchenaid Ice Cream Recipe is your launchpad. Don’t be afraid to experiment with flavors and mix-ins once you’re comfortable. Embrace the process, enjoy the churning, and get ready to scoop up the rewards of your delicious homemade creation. Happy ice cream making!
FAQs: Your Kitchenaid Ice Cream Questions Answered
Q1: Why is my homemade ice cream icy instead of creamy?
A1: This is the most common issue! Culprits usually include: 1) The freezer bowl wasn’t frozen solid enough. 2) The custard base wasn’t chilled thoroughly (it must be below 40°F/4°C). 3) Using ingredients with lower fat content (like low-fat milk instead of cream). 4) Adding mix-ins with high water content too early. Ensure every step involving cold temperatures is followed precisely for a creamy Kitchenaid Ice Cream Recipe.
Q2: Does the KitchenAid freezer bowl need to be frozen for 15+ hours?
A2: Yes! The bowl contains a freezing liquid between its walls that needs to be completely solid to effectively freeze the ice cream base as it churns. If it’s not cold enough, the base won’t freeze quickly enough, leading to large ice crystals and poor texture. It’s the most critical prep step for any Kitchenaid Ice Cream Recipe.
Q3: Can I make this Kitchenaid Ice Cream Recipe dairy-free?
A3: You can experiment, but it requires significant adjustments. Full-fat canned coconut milk/cream is often the best substitute for heavy cream due to its high fat content. Combine it with a richer non-dairy milk like oat or cashew. You may need to adjust the sugar levels or add a neutral oil or stabilizer (like a tiny bit of xanthan gum) to achieve a smoother texture, as non-dairy bases freeze harder. The results will differ from a traditional dairy Kitchenaid Ice Cream Recipe.
Q4: Can I reduce the sugar in the recipe?
A4: You can reduce it slightly, but be cautious. Sugar does more than sweeten; it lowers the freezing point, keeping the ice cream scoopable. Reducing it too much will result in a harder, icier texture. It’s a key component for the structure of this Kitchenaid Ice Cream Recipe.
Q5: How long does homemade ice cream last in the freezer?
A5: For the best texture and flavor, aim to eat your homemade Kitchenaid Ice Cream Recipe within 1-2 weeks. While it might be safe to eat for longer (1-2 months if stored properly), it’s prone to developing ice crystals and absorbing freezer odors over time because it lacks commercial stabilizers. Proper storage (airtight container, plastic wrap on the surface, coldest freezer spot) is key.
Suggested Source Links
- Kitchenaid Ice Cream Maker Manual
- Serious Eats Ice Cream Guide
- The Kitchn – Homemade Vanilla Ice Cream
- Food52 – Custard vs. No-Custard Ice Cream
- Kitchenaid Ice Cream Recipe
Source Links
- Loaded Potato Casserole Recipe Kim J: How to Make It Perfect https://ghitarecipes.com/loaded-potato-casserole-recipe-kim-j/
- Chicken Dressing Recipe: How to Elevate Your Holiday Meal https://ghitarecipes.com/chicken-dressing-recipe/
- Best Tofu Marinade Chicken Recipes: How to Make Them Tasty https://ghitarecipes.com/best-tofu-marinade-chicken-recipes/
- Baked Chicken Cutlet Recipes: How to Make Them Crispy https://ghitarecipes.com/best-tofu-marinade-chicken-recipes/
- Spark Recipes Chicken Taco Soup: How to Make It Flavorful https://ghitarecipes.com/spark-recipes-chicken-taco-soup/
- Diabetic Recipe for Crock Pot Soup with Chicken: How to Serve It https://ghitarecipes.com/diabetic-recipe-for-crock-pot-soup-with-chicken/
- Famous Recipe Chicken Near Me: How to Find the Best Spots https://ghitarecipes.com/famous-recipe-chicken-near-me/
- How to Make the Best Diabetic Crockpot Recipes Gnocchi and Chicken in 5 Steps https://ghitarecipes.com/diabetic-crockpot-recipes-gnocchi-and-chicken-2/
- How to Make the Best Chicken Philly Cheesesteak Recipe in 5 Steps https://ghitarecipes.com/chicken-philly-cheesesteak-recipe/
- Chicken and Cheese Jalousie Recipe: 5 Easy Steps to Make https://ghitarecipes.com/chicken-and-cheese-jalousie-recipe/
- How to Make the Best Chick Fil A Kale Salad Recipe in 5 Steps https://ghitarecipes.com/chick-fil-a-kale-salad-recipe/
- 7 Best Blackstone Chicken Recipes You Need to Try This Season https://ghitarecipes.com/blackstone-chicken-recipes/
- 7 Secrets Behind the Perfect Ground Chicken Mexican Corn Recipe https://ghitarecipes.com/ground-chicken-mexican-corn-recipe-2/
- Why This 3-Ingredient Recipe for Pasta Fazool Made with Chicken Is a Game Changer https://ghitarecipes.com/pasta-fazool-made-with-chicken/
- Braised Chicken in the Oven with Crispy Skin Recipe: 7 Flavor Boosters https://ghitarecipes.com/braised-chicken-in-the-oven-with-crispy-skin/
- Best 7 Ways to Use Chicken_and_cheese_filling in Your Dishes https://ghitarecipes.com/chicken-and-cheese-filling/
- Chicken and Gravy Recipe: How to Make It in 30 Minutes https://ghitarecipes.com/chicken-and-gravy-recipe/