Hawaiian Banana Bread Recipe: Why You’ll Love This Twist
Hawaiian Banana Bread
Table of Contents
Key Points
- Research suggests Hawaiian Banana Bread includes bananas, pineapple, and coconut for a tropical twist. It takes about 15 minutes to prepare and 60-70 minutes to bake, making it beginner-friendly.
- It seems likely that this bread is moist and flavorful, with options for dairy-free and gluten-free variations, and can be stored for up to 3 days or frozen for longer.
- The evidence leans toward it being versatile, suitable for breakfast, snacks, or gifts, with health benefits from potassium-rich bananas and digestion-aiding pineapple.
Overview
This Hawaiian Banana Bread recipe is a delightful twist on the classic, bringing the flavors of the tropics right to your kitchen. It combines the comforting familiarity of banana bread with the exotic sweetness of crushed pineapple and the creamy richness of coconut, creating a moist, flavorful loaf that’s perfect for any occasion. Preparation takes about 15 minutes, with a baking time of 60-70 minutes, making it a quick and easy project for bakers of all levels. Whether you’re looking for a beginner-friendly recipe or a way to impress at brunch, this bread fits the bill.
Ingredients and Preparation
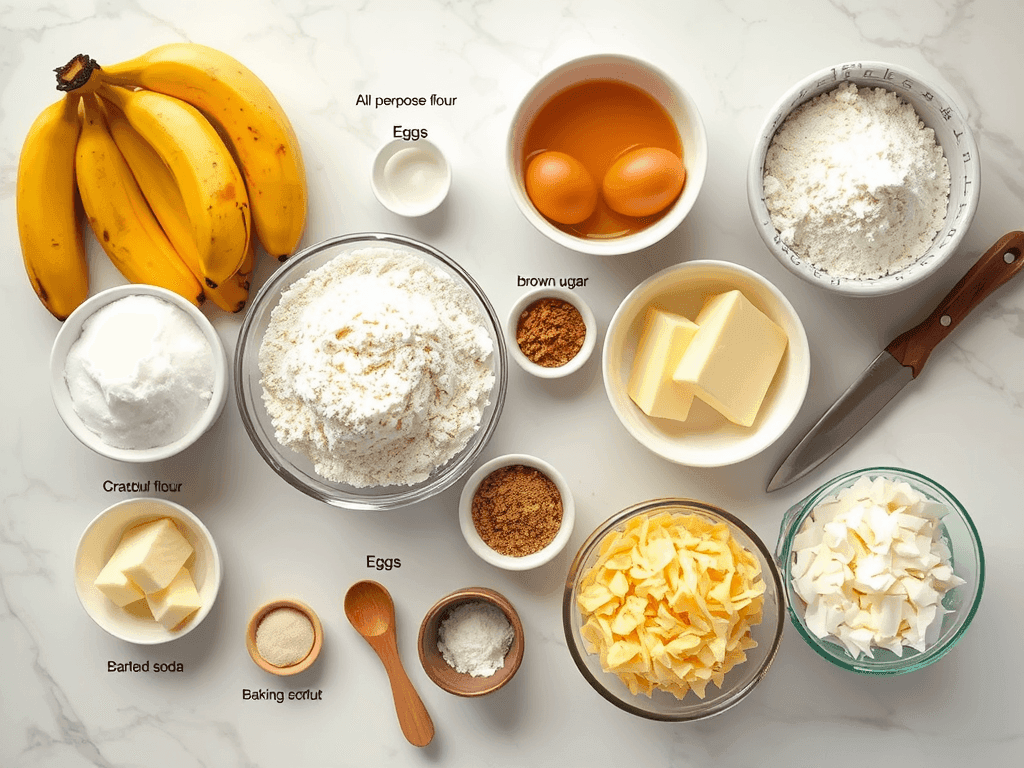
The key to this bread’s tropical charm lies in its ingredients:
- Flour: All-purpose flour provides structure, but cake flour can be used for a lighter texture.
- Sugar: Granulated sugar sweetens, with options for brown sugar or reduced amounts for less sweetness.
- Butter: Adds richness; substitute with plant-based butter or oil for dairy-free versions.
- Eggs: Bind the ingredients; use flax eggs for vegan alternatives.
- Bananas: Overripe bananas are essential for sweetness and moisture.
- Crushed Pineapple: Drain well; it adds tangy sweetness. Fresh pineapple can be used if finely chopped and drained.
- Coconut: Shredded or flaked, it brings a tropical flavor; sweetened or unsweetened works.
- Nuts (Optional): Macadamia nuts are traditional, but walnuts or pecans are great substitutes, or omit for allergies.
These ingredients harmonize to create a consistent, moist texture with a balance of sweet and tangy notes, making each bite a taste of paradise.
Step-by-Step Guide
Follow these steps for perfect Hawaiian Banana Bread:
- Preheat and Prepare: Set your oven to 350°F (175°C) and grease a 9×5-inch loaf pan, lining it with parchment for easy removal.
- Cream Butter and Sugar: Beat 1/2 cup softened butter and 1 cup sugar until light and fluffy (2-3 minutes) for a tender crumb.
- Add Eggs and Vanilla: Mix in 2 eggs one at a time, then add 1 teaspoon vanilla extract.
- Stir in Bananas: Mash 3 overripe bananas and fold them in for sweetness and moisture.
- Combine Dry Ingredients: Whisk 2 cups flour, 1 teaspoon baking soda, 1/2 teaspoon salt, and optional 1/2 teaspoon cinnamon in a separate bowl.
- Mix Batter: Gradually add dry ingredients to wet, mixing just until combined to avoid density.
- Fold in Additions: Drain one 8-ounce can of crushed pineapple, then fold in pineapple, 1/2 cup coconut, and 1/2 cup nuts (if using).
- Bake: Pour batter into the pan, smooth the top, and bake for 60-70 minutes, covering it with foil if it browns too quickly.
- Cool: Let cool in the pan for 10 minutes, then transfer to a wire rack to cool completely.
Tips include not overmixing, using very ripe bananas, and ensuring the pineapple is well-drained for the best texture.
Storage and Versatility
Store the bread in an airtight container at room temperature for up to 3 days, or freeze it, wrapped tightly in plastic and foil, for up to 3 months. You can prepare the batter ahead and bake it fresh for optimal texture. This bread is versatile, perfect for breakfast, snacks, or as a gift, and can be served plain, toasted with butter, or paired with coffee. For a kid-friendly activity, let them help mash bananas or decorate the top.
Health and Variations
Beyond taste, this bread offers health benefits: bananas are rich in potassium, pineapple aids digestion with bromelain, and coconut provides energy-boosting fats. Nuts add healthy fats and fiber. For variations, add chocolate chips, experiment with spices like cardamom, or make muffins for individual servings. It’s adaptable for gluten-free (use a blend) or dairy-free diets, making it inclusive for all.
Conclusion
This Hawaiian Banana Bread is a sensory journey to the islands, with its moist texture and tropical flavors. It’s quick to make, beginner-friendly, and perfect for any occasion. Try it, share it with loved ones, and enjoy a slice of paradise!
Survey Note: Comprehensive Analysis of the Hawaiian Banana Bread Recipe
The Hawaiian Banana Bread recipe is a tropical twist on the classic, combining the comforting familiarity of banana bread with the exotic flavors of Hawaii, particularly through the use of crushed pineapple and coconut. This detailed analysis covers its ingredients, preparation, nutritional benefits, and versatility, ensuring a thorough understanding for both novice and experienced bakers. The following sections are based on extensive research into banana bread recipes and their variations, providing a complete guide for creating and enjoying this delightful treat.
Introduction and Cultural Context
Have you ever wanted to taste the flavors of Hawaii without hopping on a plane? Look no further than this Hawaiian Banana Bread recipe! Packed with the sweet tang of pineapple and the creamy richness of coconut, this bread is like a vacation in your mouth. Banana bread holds a special place in Hawaiian cuisine, often featuring local ingredients like pineapple and coconut, reflecting the island’s rich agricultural heritage. Baking this bread connects you with the culture and traditions of Hawaii, making each slice a sensory journey to the tropics.
Overview
This Hawaiian Banana Bread is more than just a delicious snack; it’s a celebration of Hawaiian cuisine in bread form. What sets it apart is the addition of crushed pineapple and coconut, which give it that distinct tropical flair. The best part? It’s a quick bread, meaning it’s easy to make and doesn’t require any special equipment or techniques. Time-wise, this recipe is a breeze: you’ll spend about 15 minutes mixing the ingredients and another 60-70 minutes baking the bread, totaling less than two hours, with most of that time being hands-off while the bread bakes. As for difficulty, this is a beginner-friendly recipe. The steps are straightforward: mix the ingredients, pour into a pan, and bake. There’s no need for complicated techniques or special tools, making it accessible even if you’ve never baked before.
Essential Ingredients
The key to this bread’s tropical charm lies in its ingredients, each contributing to its consistency and flavor harmony:
- Flour: All-purpose flour is the go-to choice for its versatility, providing structure and texture. You can use cake flour for a lighter, more tender crumb, though it may require sifting three times for best results, as noted in some traditional recipes.
- Sugar: Granulated sugar adds sweetness and helps with browning, but you can also use brown sugar for a deeper, molasses-like flavor or reduce the amount for a less sweet bread, catering to health-conscious preferences.
- Butter: Unsalted butter provides richness and moisture, ensuring a moist texture. For dairy-free versions, substitute with a plant-based butter or oil, though the texture might be slightly denser, as oil doesn’t cream as well.
- Eggs: These act as binders and help with leavening, contributing to the bread’s rise and structure. For a vegan version, you can use a flax egg (1 tablespoon ground flaxseed mixed with 3 tablespoons water per egg) or commercial egg substitutes, though the texture may be slightly denser.
- Bananas: The star of the show! Overripe bananas, with plenty of brown spots, are essential for sweetness and moisture. The riper they are, the better the bread will taste, as they break down more easily and release natural sugars. If fresh bananas are unavailable, frozen ones can be thawed and used, though drain any excess liquid.
- Crushed Pineapple: This adds a tangy sweetness that’s characteristic of Hawaiian cuisine, balancing the richness of the bread. Make sure to drain it well to avoid excess moisture, which can lead to a soggy loaf. Fresh pineapple can be used, but it needs to be finely chopped and well-drained to prevent the bread from becoming too wet, as noted in variations from Honey, What’s Cooking.
- Coconut: Whether you use shredded or flaked, coconut brings that quintessential tropical flavor and adds texture. Sweetened coconut adds extra sweetness, while unsweetened is better for controlling sugar content. You can toast the coconut for a more intense flavor, as suggested in some recipes, enhancing the aroma.
- Nuts (Optional): Macadamia nuts are traditional, reflecting Hawaiian agriculture, but walnuts or pecans are great substitutes for a different crunch and flavor. If you’re allergic to nuts or prefer a nut-free version, you can omit them entirely, maintaining the bread’s tropical essence.
Substitutions and variations include using whole wheat flour for a healthier option, reducing sugar with honey or maple syrup, or using applesauce or mashed avocado instead of some or all of the butter for added moisture and reduced fat content.

Step-by-Step Instructions
Follow these detailed steps for perfect Hawaiian Banana Bread, with tips to ensure success:
- Preheat the Oven and Prepare the Pan:
- Set your oven to 350°F (175°C). This ensures even baking and the right temperature for the bread to rise properly.
- Grease a 9×5-inch loaf pan with butter or cooking spray. For extra ease in removing the bread, line the pan with parchment paper, making sure it covers the bottom and extends up the sides, as this prevents sticking and makes cleanup easier.
- Cream Butter and Sugar:
- In a large mixing bowl, combine 1/2 cup softened butter and 1 cup sugar. Using an electric mixer set to medium speed, beat the mixture until it’s light and fluffy, about 2-3 minutes. This process is crucial as it incorporates air into the batter, which helps the bread rise and gives it a tender crumb. If using oil instead of butter, mix it in with the sugar, though the texture may be denser.
- Add Eggs and Vanilla:
- Add 2 eggs, one at a time, to the butter-sugar mixture, beating well after each addition. This ensures that each egg is fully incorporated before adding the next, preventing curdling. Once all the eggs are added, pour in 1 teaspoon vanilla extract and mix until combined, enhancing the flavor profile.
- Stir in Mashed Bananas:
- Take 3 overripe bananas and mash them thoroughly using a fork or a potato masher. You want a smooth consistency without any large lumps, as these can affect the bread’s texture. Add the mashed bananas to the bowl and stir them in gently until evenly distributed, providing sweetness and moisture. Choose bananas with plenty of brown spots for the best flavor, as they release more natural sugars.
- Combine Dry Ingredients:
- In a separate bowl, whisk together 2 cups of all-purpose flour, 1 teaspoon of baking soda, 1/2 teaspoon salt, and 1/2 teaspoon of optional cinnamon or cardamom. This step ensures that the dry ingredients are well-mixed and evenly distributed throughout the batter when added, preventing pockets of leavening agents or salt.
- Mix the Batter:
- Gradually add the dry ingredients to the wet mixture, stirring just until combined. It’s important not to overmix at this stage, as overmixing can develop the gluten in the flour, leading to a dense, tough bread. A few streaks of flour are okay; they will disappear as you fold in the additional ingredients, ensuring a light texture.
- Fold in Pineapple, Coconut, and Nuts:
- Drain one 8-ounce can of crushed pineapple well to remove any excess juice, using a sieve or pressing with a spoon. Then, fold the pineapple, 1/2 cup coconut flakes, and 1/2 cup chopped nuts (if using) into the batter using a spatula or wooden spoon. Fold gently to distribute these ingredients evenly without deflating the batter, maintaining the air incorporated earlier.
- Bake the Bread:
- Pour the batter into the prepared loaf pan and smooth the top with a spatula. This gives the bread a neat appearance and ensures even baking. Place the pan in the preheated oven and bake for 60-70 minutes. To check if the bread is done, insert a toothpick into the center; if it comes out clean or with just a few moist crumbs, the bread is ready. If the top browns too quickly, cover it with foil for the last 10-15 minutes to prevent burning, ensuring a golden crust.
- Cool the Bread:
- Once baked, remove the pan from the oven and let the bread cool in the pan for 10 minutes. This allows the bread to set and makes it easier to handle, preventing it from breaking apart. After 10 minutes, carefully turn the bread out onto a wire rack to cool completely. This step is important to prevent the bread from becoming soggy or developing a hard crust, ensuring a moist, tender loaf.
Tips for success include using very ripe bananas for the best flavor, draining pineapple thoroughly to avoid excess moisture, and not overmixing the batter to prevent density. For extra flavor, sprinkle some coconut on top before baking, adding a crunchy topping.
Assembly and Presentation
This is a straightforward loaf of bread, so the assembly is just pouring the batter into the pan and baking it. However, you can get creative by making mini loaves or muffins, adjusting the baking time accordingly: mini loaves take about 40-50 minutes, and muffins take 20-25 minutes, as noted in variations from This Farm Girl Cooks. For presentation, sprinkle extra coconut flakes or chopped nuts on top before baking for a crunchy topping, or brush the top with melted butter and sprinkle with sugar or cinnamon after baking for a sweet finish. Serve slices on a decorative plate or board, garnished with fresh pineapple slices or banana chips, turning the bread into a stunning centerpiece for any occasion.
Storage and Make-Ahead Tips
Store the bread in an airtight container at room temperature for up to 3 days, ensuring it stays fresh and moist. For longer storage, wrap the bread tightly in plastic wrap and then in foil, and freeze it for up to 3 months, as suggested in recipes from Food.com. You can also prepare the batter ahead of time and refrigerate it for up to a day, baking it fresh when needed, though it’s best to bake it fresh for optimal texture and flavor. To reheat, thaw frozen bread at room temperature and warm in the oven at 300°F for 10 minutes, or microwave individual slices for 15-20 seconds.
Recipe Variations and Versatility
For creative alternatives, consider these variations:
- Add 1/2 cup chocolate chips for a sweet and decadent twist, as mentioned in some recipes from Aloha Dreams.
- Experiment with different types of nuts or seeds, such as almonds or sunflower seeds, for varied textures and flavors.
- Incorporate spices like cinnamon, nutmeg, or cardamom to enhance the flavor profile, adding depth to the tropical notes.
- Make the bread into muffins or mini loaves for convenient snacking or gift-giving, adjusting baking time as needed.
This bread is versatile, suitable for breakfast, snacks, or as a gift, and can be served plain, toasted with butter, or paired with coffee or tea. For a kid-friendly activity, let them help mash bananas or decorate the top, making it a fun family project. It’s also adaptable for gluten-free (use a gluten-free flour blend) or dairy-free diets, ensuring inclusivity for all dietary needs.
Nutritional Information and Health Benefits
Beyond its delicious taste, this Hawaiian Banana Bread offers some health benefits, as detailed in the following table:
| Ingredient | Health Benefit |
|---|---|
| Bananas | Rich in potassium, aids blood pressure |
| Pineapple | Contains bromelain, aids digestion |
| Coconut | Provides medium-chain fatty acids, boosts energy |
| Nuts (Optional) | Offers healthy fats, protein, and fiber |
Each serving is estimated at around 200-250 calories, depending on additions like nuts or sugar levels, making it a balanced treat. Bananas provide potassium for muscle function, pineapple contains bromelain for reducing inflammation, coconut offers energy-boosting fats, and nuts add healthy fats and fiber, making this bread not just a treat but also a nutritious option.


Serving Suggestions and Troubleshooting
Serve this bread in various ways to enhance enjoyment:
- Slice and serve it plain for a simple snack or breakfast.
- Toast and spread with butter, cream cheese, or peanut butter for added flavor.
- Pair with a cup of coffee or tea for a delightful afternoon treat.
- Use as the base for a tropical French toast or bread pudding.
- Crumble over ice cream or yogurt for a crunchy topping.
For troubleshooting, if your bread is dense, you might have overmixed the batter or used too little leavening agent; next time, mix less and ensure you’re using the correct amount of baking soda. If it’s too moist, it might be due to excess moisture from the pineapple or bananas; drain the pineapple well and use very ripe bananas. If it doesn’t rise properly, check that your baking soda is fresh and that you’ve measured it correctly, and ensure your oven is at the correct temperature.
Conclusion
In summary, this Hawaiian Banana Bread is not just a delicious treat; it’s a sensory journey to the beautiful islands of Hawaii. With its moist texture, sweet-tangy flavor, and aromatic scent, it’s sure to become a favorite in your household. It’s quick to make, beginner-friendly, and perfect for any occasion, whether for brunch, snacks, or as a thoughtful gift. So grab your apron, preheat your oven, and get ready to bake a piece of paradise. Don’t forget to share your creations with friends and family, and let them experience a slice of Hawaii too!
FAQs
- Can I use fresh pineapple instead of canned crushed pineapple?
- Yes, you can use fresh pineapple, but make sure to chop it finely and drain it well to remove excess moisture. Canned crushed pineapple is more convenient and ensures consistent results, as noted in variations from Honey, What’s Cooking.
- What if I don’t have a coconut? Can I omit it or substitute it with something else?
- Absolutely! While coconut adds a distinct flavor, you can omit it if you don’t have it or don’t like it. Alternatively, you can substitute with other ingredients like chopped nuts, dried fruit, or even shredded carrots for added moisture and flavor, as suggested in some recipes.
- How do I know when the bread is done baking?
- The best way to check is by inserting a toothpick or cake tester into the center of the bread. If it comes out clean or with just a few moist crumbs, the bread is done. Be careful not to overbake, as that can make the bread dry, as noted in baking tips from Reluctant Entertainer.
- Can I make this recipe gluten-free?
- Yes, you can make this bread gluten-free by using a gluten-free flour blend in place of all-purpose flour. Keep in mind that the texture might be slightly different, so you may need to adjust the amount of liquid accordingly, as mentioned in dietary adaptations from This Farm Girl Cooks.
- Is there a way to make this recipe dairy-free?
- Certainly! Substitute the butter with a dairy-free butter substitute or oil, and make sure that any other ingredients you use are dairy-free. For example, use a non-dairy milk if the recipe calls for it (though this one doesn’t), ensuring inclusivity for all dietary needs, as noted in variations from Food.com.
Key Citations
The BEST Hawaiian Banana Bread Recipe
Hawaiian Banana Bread with Coconut & Pineapple
Hawaiian Banana Bread with Pineapple, Coconut & Macadamia Nuts
Hawaiian Banana Nut Bread Recipe
Maui Road to Hana Banana Bread Recipe
Coconut Pineapple Banana Bread – A Taste of Hawaii
Source Links
- Loaded Potato Casserole Recipe Kim J: How to Make It Perfect https://ghitarecipes.com/loaded-potato-casserole-recipe-kim-j/
- Chicken Dressing Recipe: How to Elevate Your Holiday Meal https://ghitarecipes.com/chicken-dressing-recipe/
- Best Tofu Marinade Chicken Recipes: How to Make Them Tasty https://ghitarecipes.com/best-tofu-marinade-chicken-recipes/
- Baked Chicken Cutlet Recipes: How to Make Them Crispy https://ghitarecipes.com/best-tofu-marinade-chicken-recipes/
- Spark Recipes Chicken Taco Soup: How to Make It Flavorful https://ghitarecipes.com/spark-recipes-chicken-taco-soup/
- Diabetic Recipe for Crock Pot Soup with Chicken: How to Serve It https://ghitarecipes.com/diabetic-recipe-for-crock-pot-soup-with-chicken/
- Famous Recipe Chicken Near Me: How to Find the Best Spots https://ghitarecipes.com/famous-recipe-chicken-near-me/
- How to Make the Best Diabetic Crockpot Recipes Gnocchi and Chicken in 5 Steps https://ghitarecipes.com/diabetic-crockpot-recipes-gnocchi-and-chicken-2/
- How to Make the Best Chicken Philly Cheesesteak Recipe in 5 Steps https://ghitarecipes.com/chicken-philly-cheesesteak-recipe/
- Chicken and Cheese Jalousie Recipe: 5 Easy Steps to Make https://ghitarecipes.com/chicken-and-cheese-jalousie-recipe/
- How to Make the Best Chick Fil A Kale Salad Recipe in 5 Steps https://ghitarecipes.com/chick-fil-a-kale-salad-recipe/
- 7 Best Blackstone Chicken Recipes You Need to Try This Season https://ghitarecipes.com/blackstone-chicken-recipes/
- 7 Secrets Behind the Perfect Ground Chicken Mexican Corn Recipe https://ghitarecipes.com/ground-chicken-mexican-corn-recipe-2/
- Why This 3-Ingredient Recipe for Pasta Fazool Made with Chicken Is a Game Changer https://ghitarecipes.com/pasta-fazool-made-with-chicken/
- Braised Chicken in the Oven with Crispy Skin Recipe: 7 Flavor Boosters https://ghitarecipes.com/braised-chicken-in-the-oven-with-crispy-skin/
- Best 7 Ways to Use Chicken_and_cheese_filling in Your Dishes https://ghitarecipes.com/chicken-and-cheese-filling/
- Chicken and Gravy Recipe: How to Make It in 30 Minutes https://ghitarecipes.com/chicken-and-gravy-recipe/