Chocolate Cake Recipe From Scratch Easy Halloween: How to Wow
chocolate cake recipe from scratch easy Halloween
Table of Contents
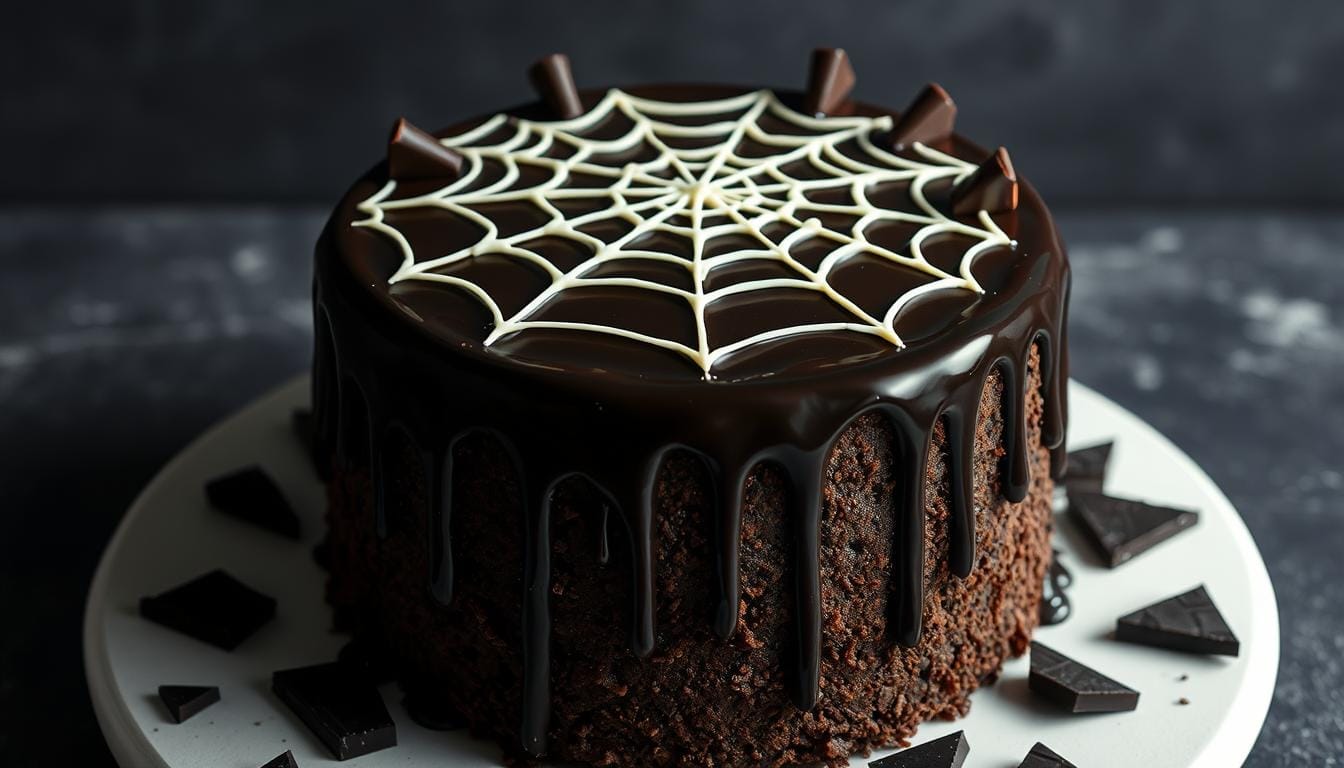
A delectable Halloween-themed chocolate cake, freshly baked with a rich, decadent crumb. The cake is adorned with a glossy, jet-black ganache frosting, cascading down the sides like ebony lava. Atop the cake, an intricate spider web pattern is piped in white chocolate, the webs stretching across the surface. Strategically placed around the cake are artfully arranged dark chocolate shards, resembling shattered glass. Soft, moody lighting casts dramatic shadows, heightening the spooky ambiance. The entire scene is captured in a low-angle perspective, emphasizing the towering presence of this indulgent Halloween treat.
Looking for a Halloween dessert that will wow your guests? This homemade chocolate cake recipe is perfect. It turns simple baking into a fun Halloween adventure. It’s great for Halloween parties or just a special treat.
Making a chocolate cake from scratch might seem hard. But with the right steps, you can make a dessert that looks and tastes amazing. This recipe makes complex baking easy, even for beginners.
Picture presenting a moist chocolate cake with spooky Halloween designs. It will be the star of any Halloween event. Your cake will show that you don’t need to be a pro to make an impressive dessert.
Key Takeaways
- Learn an easy chocolate cake recipe perfect for Halloween
- Discover simple decorating techniques for stunning results
- Build confidence in your baking skills
- Create a memorable dessert that impresses guests
- Transform basic ingredients into a spectacular Halloween treat
Essential Halloween Baking Equipment and Ingredients
To make a great Halloween chocolate cake, you need more than just a love for baking. You’ll also need the right tools, top-notch ingredients, and creative supplies. These will turn your kitchen into a spooky wonderland.
Starting your Halloween baking journey means collecting the best tools and ingredients. Each one is key to making a cake that’s both tasty and scary.
Must-Have Kitchen Tools
- 9-inch round cake pans (2 recommended)
- Electric mixer with paddle attachment
- Offset spatula for smooth frosting
- Digital kitchen scale for precise measurements
- Cooling racks
- Piping bags and decorating tips
Quality Ingredients Checklist
| Category | Recommended Items |
|---|---|
| Dry Ingredients | High-quality cocoa powder, cake flour, granulated sugar |
| Wet Ingredients | Fresh eggs, unsalted butter, vanilla extract |
| Special Halloween Ingredients | Black cocoa powder, orange food coloring |
Special Halloween Decorating Supplies
Turn your chocolate cake into a spooky masterpiece with these supplies:
- Edible Halloween sprinkles
- Black and orange fondant
- Candy eyeballs
- Wilton decorating gel in various colors
- Spooky silicone molds for sugar decorations
Quality baking tools and ingredients make your cake both delicious and beautiful. With these, you’re set to create a Halloween chocolate cake that will wow everyone!
Why This Halloween Chocolate Cake Recipe is Perfect for Beginners
Making a Halloween chocolate cake might seem scary, but this recipe makes it easy. It turns your kitchen into a spooky sweet paradise. It’s designed for beginners, so you won’t feel stressed while baking.
So, why is this recipe great for Halloween baking tips? Here are the main reasons it’s perfect for beginners:
- Simple ingredient list with no complex techniques
- Forgiving mixing method that minimizes potential errors
- Clear, step-by-step instructions designed for kitchen newcomers
- Minimal special equipment required
This recipe is all about being easy to follow. You don’t need fancy skills or tools to make a tasty Halloween treat. Every measurement is straightforward, and the techniques are explained in a way that makes even complete beginners feel confident.
| Skill Level | Complexity | Time Required |
|---|---|---|
| Beginner | Low | 1-2 hours |
Your Halloween celebration deserves a spectacular centerpiece, and this chocolate cake ensures you’ll impress your guests without feeling overwhelmed. Whether you’re a kitchen novice or looking to expand your baking skills, this recipe provides the perfect starting point for creating a memorable dessert.
Step-by-Step Chocolate Cake Recipe From Scratch Easy Halloween
Making a delicious Halloween chocolate cake from scratch might seem hard. But with the right steps, you’ll be a pro in no time. This guide will show you how to make a tasty treat that will wow your Halloween party guests.
Preparing Your Dry Ingredients
Start by measuring your dry ingredients carefully. Use a large mixing bowl to sift together these important parts:
- 2 cups all-purpose flour
- 2 cups granulated sugar
- 3/4 cup unsweetened cocoa powder
- 2 teaspoons baking soda
- 1 teaspoon baking powder
- 1 teaspoon salt
Mixing Wet Components with Precision
When mixing wet ingredients, be gentle. In another bowl, whisk together:
- 2 large eggs
- 1 cup milk
- 1/2 cup vegetable oil
- 2 teaspoons vanilla extract
- 1 cup hot water
Mastering Baking Techniques
The key to a perfect chocolate cake is in the mixing and baking. Gradually add the wet ingredients to the dry, stirring until just combined. Don’t overmix, as it can make the cake tough. Pour the batter into two greased 9-inch pans and bake at 350°F for 30-35 minutes.
Pro tip: Insert a toothpick into the center of the cake. If it comes out clean, your cake is ready!
Creating the Perfect Chocolate Frosting
Closeup of a rich, decadent chocolate cake with a thick layer of smooth, silky chocolate frosting. The frosting is glossy and has a dark, intense cocoa color, with subtle swirls and peaks adding visual interest. The cake itself is moist and fudgy, with a deep chocolate flavor. Soft, warm lighting illuminates the dessert, casting gentle shadows and highlighting the texture of the frosting. The background is blurred, putting the focus entirely on the alluring cake. A gently moody, atmospheric scene that captures the essence of an indulgent, homemade Halloween treat.
Making the perfect chocolate frosting is key to turning your Halloween cake into a masterpiece. The right frosting can make your cake the highlight of any spooky party.
First, gather your essential ingredients for a rich frosting that will wow your guests:
- Unsalted butter (room temperature)
- Powdered sugar
- Cocoa powder
- Heavy cream
- Vanilla extract
To get the frosting just right, follow these steps carefully. Start by beating the butter until it’s smooth and fluffy. Then, add powdered sugar and cocoa powder slowly, mixing at low speed to avoid a mess.
Tip for Halloween frosting: Change the chocolate flavor by adjusting the cocoa powder. For a darker, richer taste, use Dutch-processed cocoa. This will make your frosting almost black, perfect for spooky designs.
When you’re spreading the frosting, use an offset spatula for even coverage. Make sure the frosting is at the right temperature. If it’s too warm, it will slide off; too cold, it’s hard to spread.
The secret to a killer Halloween cake is in the details of your frosting!
Practice your frosting recipe a few times to get it just right. With the right ingredients and patience, you’ll make a frosting that’s both delicious and beautiful for your Halloween party.
Spooky Halloween Decorating Ideas
Turn your chocolate cake into a scary masterpiece with creative Halloween cake decorations. These spooky designs will wow both kids and adults. They transform a simple dessert into a themed centerpiece that embodies the Halloween spirit.
Your Halloween cake can become a delicious work of art. These themed cake ideas range from fun to frighteningly good. Explore exciting decoration techniques to make your cake the star of any Halloween party.
Ghost and Goblin Designs
Make ghost decorations with white royal icing or fondant. Here are some tips to bring your ghostly visions to life:
- Pipe ghostly figures using a star-tipped piping bag
- Cut fondant into wispy ghost shapes
- Use edible black food coloring for spooky facial details
- Layer white icing to create translucent ghost effects
Spider Web Patterns
Spider-web designs add a creepy touch to your Halloween cake decorations. Learn these techniques to create web-like patterns:
- Start with a smooth base frosting
- Use black or dark gray icing for contrast
- Draw web lines with a thin piping tip
- Add small fondant spiders for an extra scare factor
Graveyard Scene Creation
Turn your cake into a miniature haunted landscape with a realistic graveyard scene. Use these spooky cake design elements to create a chilling tableau:
- Crush chocolate cookies for “dirt” texture
- Create tombstone shapes from gray fondant
- Use edible moss and small plastic skeletons
- Add subtle lighting effects with edible shimmer dust
With these Halloween cake decorating techniques, you’ll make a dessert that’s not just tasty but also a visual masterpiece. It will capture the essence of the spooky season.
Tips for Achieving the Perfect Cake Texture
A close-up, high-resolution image of a moist, rich chocolate cake texture, featuring a soft, velvety appearance with a slight sheen. The crumb should be finely textured, with a dense, fudgy interior and a delicate, tender crumb. Capture the intricate detail of the cake’s structure, highlighting the contrast between the moist, chocolaty interior and the thin, crisp crust. Utilize natural lighting from a slight overhead angle to accentuate the depth and depth of the cake’s layers. Employ a shallow depth of field to isolate the cake texture and create a sense of visual focus and depth. Convey a mood of indulgence, comfort, and a celebration of the art of baking.
To make a moist chocolate cake, you need to be precise and know your baking science. Getting the perfect cake texture is all about mastering a few key tips. These tips can take your baking from good to amazing.
How warm your ingredients are matters a lot for the cake’s texture. Ingredients at room temperature mix better, making a batter that’s even. Cold eggs or butter can mess up the mix and make the texture uneven.
- Use room temperature ingredients for smoother mixing
- Sift dry ingredients to prevent lumps
- Measure ingredients precisely
- Mix the batter just until ingredients are combined
The way you mix the batter is also very important. Overmixing can develop excess gluten, making the cake tough and dense. Mix gently until just combined to keep the cake light and tender.
| Technique | Impact on Cake Texture |
|---|---|
| Proper Ingredient Mixing | Prevents tough, dense texture |
| Room Temperature Ingredients | Ensures smooth, even batter |
| Precise Measurements | Maintains consistent moisture |
The last steps to perfect cake texture are baking time and temperature. Always preheat your oven and use a thermometer for accurate temperature. Check the cake a few minutes before the suggested time to avoid drying it out.
Common Mistakes to Avoid When Baking From Scratch
Baking a perfect cake needs precision and focus. Knowing common mistakes helps you fix and improve your baking. It’s not just about fixing errors, but also preventing them.
Professional bakers say small mistakes can ruin your dessert. Learning to spot and avoid these errors will make baking better.
Temperature Control Challenges
Getting the temperature right is key in cake baking. Your oven might not show the real temperature. To avoid mistakes, use an oven thermometer for accuracy.
- Preheat the oven completely before baking.
- Use room temperature ingredients
- Avoid opening the oven door frequently
Ingredient Measurement Precision
Getting the right amount of ingredients is vital. Wrong amounts can make cakes dense, dry, or fall apart.
| Measurement Error | Potential Outcome |
|---|---|
| Too much flour | Dry, crumbly cake |
| Too little liquid | Dense, heavy texture |
| Incorrect sugar amount | Imbalanced sweetness |
Timing Considerations
Baking is a science where timing is everything. Overmixing or undermixing can change your cake’s texture and structure.
- Mix ingredients just until combined
- Follow recipe timing precisely
- Use a timer to track the baking duration
By knowing these common mistakes, you’ll make delicious cakes from scratch every time.
Make-Ahead and Storage Guidelines
Preparing a Halloween cake ahead of time can save you stress. It ensures a delicious dessert for your spooky celebration. Cake storage tips are key to keeping your homemade cake perfect.
For make-ahead desserts, your Halloween chocolate cake can be prepared in advance. Use the right preservation techniques. Here are the main strategies for keeping your cake fresh:
- Cool the cake completely before storing
- Wrap unfrosted layers tightly in plastic wrap
- Store cake layers at room temperature for up to 2 days
- Refrigerate frosted cakes for extended freshness
Freezing is great for longer storage. Wrap individual cake layers in two layers of plastic wrap and then aluminum foil. Frozen cake layers can last up to 3 months when sealed well. Thaw the cake in the refrigerator overnight when you’re ready to serve.
Pro tip: Always add decorative elements like spider web designs or Halloween-themed toppers just before serving to maintain their crisp appearance.
Transporting decorated cakes can be tricky. Use a sturdy cake carrier with a tight-fitting lid to prevent damage. If possible, transport cake layers separately and assemble them at your destination.
- Use a non-slip mat in the cake carrier
- Keep the cake level during transport
- Avoid direct sunlight or extreme temperatures
By following these cake storage tips, your Halloween dessert will stay delicious and look great from start to finish.
Conclusion
Making a homemade chocolate cake for Halloween is more than a recipe. It’s a chance to create a special moment. Your baking journey shows that anyone can make a dessert that wows everyone.
This guide shows that you don’t need to be a pro to bake for Halloween. With a bit of practice, you can make a spooky cake. Your creativity makes the cake truly special.
Enjoy the fun of baking and decorating. Every cake you make makes you more confident. Start small, try new things, and remember, practice makes perfect. Your cake will be a big part of your Halloween fun.
Share your baking stories with others. Post pictures of your cakes, share decorating tips and enjoy making something special. Your baking success is just a recipe away!
FAQ
How long does this strawberry shortcake parfait take to prepare?
This no-bake dessert is quick to make, rand eady in 15-20 minutes. It’s perfect for sudden cravings or last-minute gatherings.
Can I make this parfait ahead of time?
Yes, you can prepare parts of it ahead. Keep whipped cream, shortcake, and strawberries in the fridge. Assemble just before serving for the best texture.
What if I can’t find fresh strawberries?
Fresh strawberries are best, but you can use thawed and drained frozen strawberries. Raspberries or blueberries also work well for a tasty dessert.
Is this dessert suitable for dietary restrictions?
The basic recipe has dairy and gluten. But, you can make it gluten-free and use dairy-free whipped cream for different diets.
How should I store leftover parfaits?
Store assembled parfaits in the fridge for up to 24 hours. Shortcake crumbs get soggy, so enjoy it fresh. Store separate parts in airtight containers.
Can children help make this dessert?
Yes, kids can help with this easy recipe. They can layer, crumble shortcake, and add whipped cream. Always supervise and give them safe tasks.
What type of glass works best for parfaits?
Use clear glass cups or mason jars to show off the layers. Any clear glass or container works well.
Source Links
- Loaded Potato Casserole Recipe Kim J: How to Make It Perfect https://ghitarecipes.com/loaded-potato-casserole-recipe-kim-j/
- Chicken Dressing Recipe: How to Elevate Your Holiday Meal https://ghitarecipes.com/chicken-dressing-recipe/
- Best Tofu Marinade Chicken Recipes: How to Make Them Tasty https://ghitarecipes.com/best-tofu-marinade-chicken-recipes/
- Baked Chicken Cutlet Recipes: How to Make Them Crispy https://ghitarecipes.com/best-tofu-marinade-chicken-recipes/
- Spark Recipes Chicken Taco Soup: How to Make It Flavorful https://ghitarecipes.com/spark-recipes-chicken-taco-soup/
- Diabetic Recipe for Crock Pot Soup with Chicken: How to Serve It https://ghitarecipes.com/diabetic-recipe-for-crock-pot-soup-with-chicken/
- Famous Recipe Chicken Near Me: How to Find the Best Spots https://ghitarecipes.com/famous-recipe-chicken-near-me/
- How to Make the Best Diabetic Crockpot Recipes Gnocchi and Chicken in 5 Steps https://ghitarecipes.com/diabetic-crockpot-recipes-gnocchi-and-chicken-2/
- How to Make the Best Chicken Philly Cheesesteak Recipe in 5 Steps https://ghitarecipes.com/chicken-philly-cheesesteak-recipe/
- Chicken and Cheese Jalousie Recipe: 5 Easy Steps to Make https://ghitarecipes.com/chicken-and-cheese-jalousie-recipe/
- How to Make the Best Chick Fil A Kale Salad Recipe in 5 Steps https://ghitarecipes.com/chick-fil-a-kale-salad-recipe/
- 7 Best Blackstone Chicken Recipes You Need to Try This Season https://ghitarecipes.com/blackstone-chicken-recipes/
- 7 Secrets Behind the Perfect Ground Chicken Mexican Corn Recipe https://ghitarecipes.com/ground-chicken-mexican-corn-recipe-2/
- Why This 3-Ingredient Recipe for Pasta Fazool Made with Chicken Is a Game Changer https://ghitarecipes.com/pasta-fazool-made-with-chicken/
- Braised Chicken in the Oven with Crispy Skin Recipe: 7 Flavor Boosters https://ghitarecipes.com/braised-chicken-in-the-oven-with-crispy-skin/
- Best 7 Ways to Use Chicken_and_cheese_filling in Your Dishes https://ghitarecipes.com/chicken-and-cheese-filling/
- Chicken and Gravy Recipe: How to Make It in 30 Minutes https://ghitarecipes.com/chicken-and-gravy-recipe/